Routine Operations
This document describes routine operations that may be performed during the operation of the Galbot robot to ensure all functions work properly.
Map Engine - Mapping & Localization
The map engine is the core foundation of the navigation function. It is not an optional add-on, but a mandatory prerequisite for navigation. Before using the navigation function, you must complete mapping and ensure localization is running properly. Failure to complete mapping and localization correctly will result in the navigation function not working.
When localization and navigation services are enabled (the robot working mode may start navigation services by default), mapping must be completed first. A new robot must be mapped before first use; otherwise, localization cannot start correctly and the robot may enter abnormal mode.
Mapping Process
Mapping is a prerequisite for navigation. You must complete the construction of an environment map before using the navigation function.
1. Prerequisites Check (Required)
Check whether the LiDAR service is running
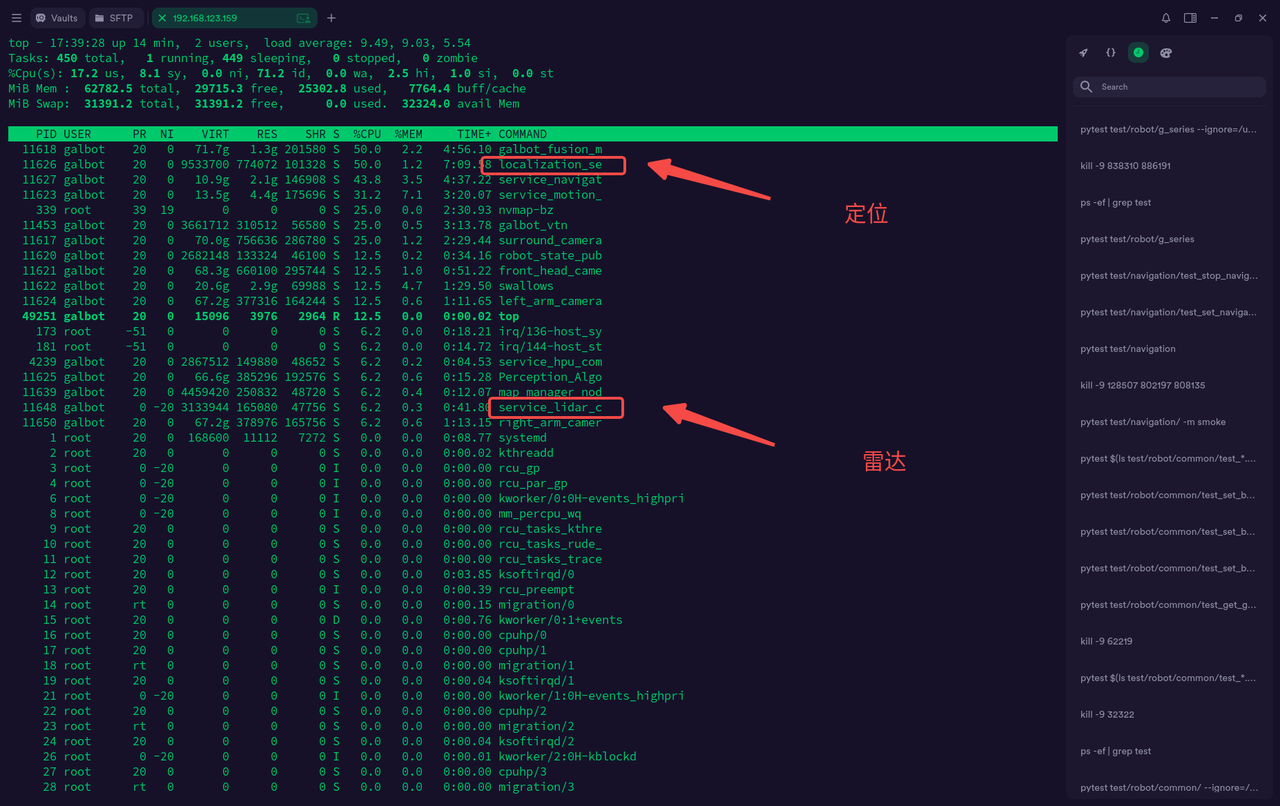
Mapping requires the LiDAR service to be running. Enter the following command on the HPU terminal to check the LiDAR process:
top
If the LiDAR has been automatically started, you can see a process named service_lidar_capture in the process list, as shown below:
If the LiDAR is not running, use the following command to start it (do not start it repeatedly):
/data/galbot/bin/service_lidar_capture
2. Log In to the Mapping Platform (Required)
Log in to the Mapping Platform
- Open a browser and go to
http://<HPU IP>:8000(for example:http://192.168.38.184:8000); you will be redirected to the login page automatically - Enter username
adminand passwordgalbot - Click the Login button to enter the platform

After logging in, the interface is divided into the following areas:
| Area | Description |
|---|---|
| Left map list | Shows all maps stored on the currently connected robot; supports edit, export, load, and apply operations |
| Center visualization area | Shows the 3D point cloud view of the selected map; renders after clicking the map's Load button |
| Right toolbar | View switching (top-down/front/side), display range, point cloud density, point size, and other parameters |
| Top-left | Import map |
| Top-right | Switch the currently connected robot device and mode |

- For an imported map archive, the zip file name must match the folder name inside it, otherwise the import will fail
- The currently applied map cannot be deleted
- The Edit, Export, and Apply Map buttons only appear once a map already exists on the HPU
- After successfully applying a map, you must manually switch to Working mode for the map to actually take effect
- If the platform becomes unresponsive or keeps loading, refresh the page and try again
- The robot's working mode is either Working or Deployment, viewable/switchable in the top-right corner of the platform. Switching mode (in either direction) requires releasing the emergency stop first, otherwise you will see
Cannot switch mode while emergency stop is activeand the switch will fail. - Clicking New Map restarts Deployment mode; the platform will prompt "Please release the emergency stop to restart Deployment mode, then press it again after entering the mapping page." Releasing the emergency stop briefly powers the motors — make sure the area around the robot is safe and someone is standing by before doing this. Once you enter the mapping page and see the point cloud rendering normally, press the emergency stop again immediately, then manually push the robot to map.
- After mapping/editing is complete, switching back to Working mode also requires briefly releasing the emergency stop, then pressing it again once the switch succeeds.
3. Start Mapping (Required)
- Make sure the robot is connected, then click the New Map button below the map list
- The first click shows a prompt reminding you to release the emergency stop to restart Deployment mode; after releasing it per the notes above, click New Map again — the platform switches to Deployment mode and automatically enters the mapping page

After entering the mapping page:
- Because of the service restart caused by the mode switch, it may take a few seconds to over ten seconds
- Once a small amount of point cloud appears on the map, the point cloud push service has started and you can begin pushing the robot to map
- Mapping data is pushed roughly every 1–1.5 seconds; the data may occasionally look unchanged for a moment if consecutive frames are similar
- If the robot is not moved, the point cloud will not change; once you start pushing it, the point cloud updates roughly every 5 seconds

- Push the robot around the environment once to build a complete map. Avoid excessive acceleration and angular velocity while pushing (approximately walking speed is sufficient)
4. Finish Mapping (Required)
- Click the Save icon (disk icon) in the top-left corner of the mapping page to save the map
- If you don't want to save the map, click the Home icon in the top-left corner to exit mapping directly
5. Apply the Map (Required)
Once a map has been created, it must be applied to the robot before it can be used for navigation and tasks.
It is generally recommended to finish editing operations such as noise removal before applying the map, to avoid having to re-apply the map after removing noise.
- Find the map you want to use in the map list on the left
- If it is a newly created map, or has not yet been loaded onto the HPU, click the Load button first to load it (this can take a few seconds to 20 seconds depending on map size and network conditions)
- If loading takes a long time with no response, refresh the page and try again
- Once the map has finished loading, click the Apply Map button (this must be done in Deployment mode; switch to Working mode afterward to take effect)
- Wait for the map to be pushed to the robot; once it succeeds you will see a success message — switch to Working mode at this point (this is important)
- After it is successfully applied, the robot will automatically load the map and attempt to localize
6. Edit the Map (Required)
This step is used to optimize map quality and improve navigation accuracy and safety. It is all done on the map editing page of the mapping platform.
- Removing Noise: Stray point cloud data in the map may cause the navigation system to misidentify obstacles, affecting path planning accuracy
- Point/Area Annotation: Without annotating key points and functional areas, the robot cannot use these preset positions and area restrictions during navigation
6.1 Remove Noise (Required)
The mapping process may pick up unwanted point cloud data (such as pedestrians, temporary obstacles, etc.), which needs to be cleaned up.
Enter Edit Mode
- In the map list, click the Load button for the target map to visualize it
- Click the Edit button to enter the map editing page

Use the Noise Removal Tool
- In the toolbar above the editing page, select Noise Removal, and configure the removal parameters:
- Selection Tool: Polygon / Rectangle / Circle
- Removal Mode: Inside (delete the selected area) / Outside (keep the selected area, delete everything else)
- Height Range: Match the current visualization range, or customize it (specify min/max height values); when "Match the current display height range" is checked, the cutting depth range cannot be edited and automatically uses the display range set in the view controls on the right; uncheck it to customize the cutting depth range
- Example: with Removal Mode set to "Inside" and the cutting depth range set to "0-2", the point cloud within the selected area between 0 and 2 meters in height is removed
Preview and Confirm
- Use the selected tool to draw a box around the area on the map that needs to be removed
- You can switch to the 3D View to preview the cut range and make sure valid data isn't accidentally removed
- Once confirmed, click Done to save the changes

6.2 Point Annotation (Optional)
Point annotation is used to mark key locations for robot tasks, such as pickup points, drop-off points, and charging points.
Two annotation methods are supported:
- Precise point creation: Move the robot to the target location, then record the coordinates using the robot's current localization as the target; the point can be edited afterward
- Approximate point creation: Manually select a location directly on the map view to create a point; the point can be edited afterward
Annotation Steps:
- Enter the editing page and click the Point Annotation button at the top
- Choose an annotation method:
- If using the robot's current localization: the map must be applied first, otherwise the real-time position cannot be obtained
- If using manual click: click the target location directly on the map
- Fill in the point information in the popup window:
- Name: point identifier (e.g.,
Pickup-A01) - Attribute: select the point type
- Z-axis orientation: adjust the robot's heading angle (-180° to 180°)
- Name: point identifier (e.g.,
- Click Confirm to save the point, and click Done to exit annotation mode

6.3 Area Annotation (Optional)
Area annotation is used to divide specific functional areas, such as no-go zones, speed-limit zones, and work zones.
- Enter the editing page and click the Area Annotation button at the top
- A toolbar pops up on the left; choose a drawing tool (Polygon/Rectangle/Circle)
- Draw a closed area in the top-down view
- Fill in the area information:
- Attribute: area type
- Click Done to save the area

6.4 Object Annotation (Optional, v1.18 and above)
Object annotation is used to mark fixed obstacles or equipment in the environment, helping the robot better understand its surroundings.
- After editing or moving an annotation, you must click Done in the popup on the left to stage the change, otherwise the modified annotation will revert to its previous state (this prevents accidental edits)
- When saving a map, it needs to be packaged and uploaded to the HPU, then uploaded from the HPU to the robot — this can take a while, so please be patient
- If there is no response for a long time, refresh the page and try again
- Every save generates a new map based on the current page state; if you want to apply that map, you must go back to the map list on the home page and apply it
7. Map Management (Optional)
7.1 Export Map
- Find the target map in the map list
- Click the Export button
- Download it via the web page
7.2 Import Map
- Click the Import button above the map list
- Select a local map file
- Click Upload and wait for the import to finish
Localization Process
Localization is a prerequisite for navigation. Before starting navigation, you must ensure the localization service is running properly and the localization status is good. When the robot has issues such as inaccurate grasping, movement drift, or lost localization, use the calibration function to restore accuracy.
1. Automatic Calibration (Required)
- Click the Calibrate Localization button above the map list
- The system enters the calibration page for the currently applied map
- The page shows the live localization score (normal range: 0.9–1.0); the system will automatically try to restore localization

2. Manual Localization Recovery (Optional, when the score is -1 or stays low)
When the localization score is -1 or remains low, manual intervention is required:
- After entering the calibration page, if you switched modes right before entering, wait a few seconds to over ten seconds for the robot's data to come back
- Once data comes back, if the localization score is far from 1.0, click the Manual Recovery button
- The yellow dot represents the robot's reported base position, and the green dot represents the position that needs calibrating; click the yellow position so that the green dot's position and orientation line up with the yellow dot
- Use the angle adjuster in the bottom-left corner to adjust the robot's heading
- Click Recover Localization at This Pose to submit
- Wait 5–10 seconds and observe the localization score change

3. Verify Localization Ready (Required)
Before starting navigation, please confirm the following checklist items:
- LiDAR service is running
- Localization service has been started
- Localization score is greater than 0.8
- Current pose is being published normally
After completing all the required steps above, you can start using the robot navigation function. For details, please refer to Tutorials - Example 3. Robot Navigation.